Annotate screenshots so they explain themselves
Point with arrows, frame with boxes and circles, label with text, and number the steps of a procedure. InnoShot also has a pen, a highlighter, curved arrows, callouts, speech bubbles and a magnifier, and every mark is its own layer that you can restyle, move or delete whenever you like.
A bare screenshot leaves the reader guessing
Send someone a plain screenshot and they have to work out what you want them to look at. An arrow at the right button, a box around the broken field or a number on each step answers that before they ask, which is why bug reports, how-to guides and support replies read so much better with a few marks on them.
In InnoShot every mark is a separate layer, not paint on the image. Pick one up later to change its color, thicken its line, move it or delete it, and the screenshot underneath stays as it was. Smart guides show when a label lines up with its neighbors, and the align tools straighten a row of markers in one step.
Annotations are also free to leave the edges of the screenshot. Once a capture sits on a background, an arrow can start in the margin and point in, and a callout can sit beside the image instead of covering what it describes.
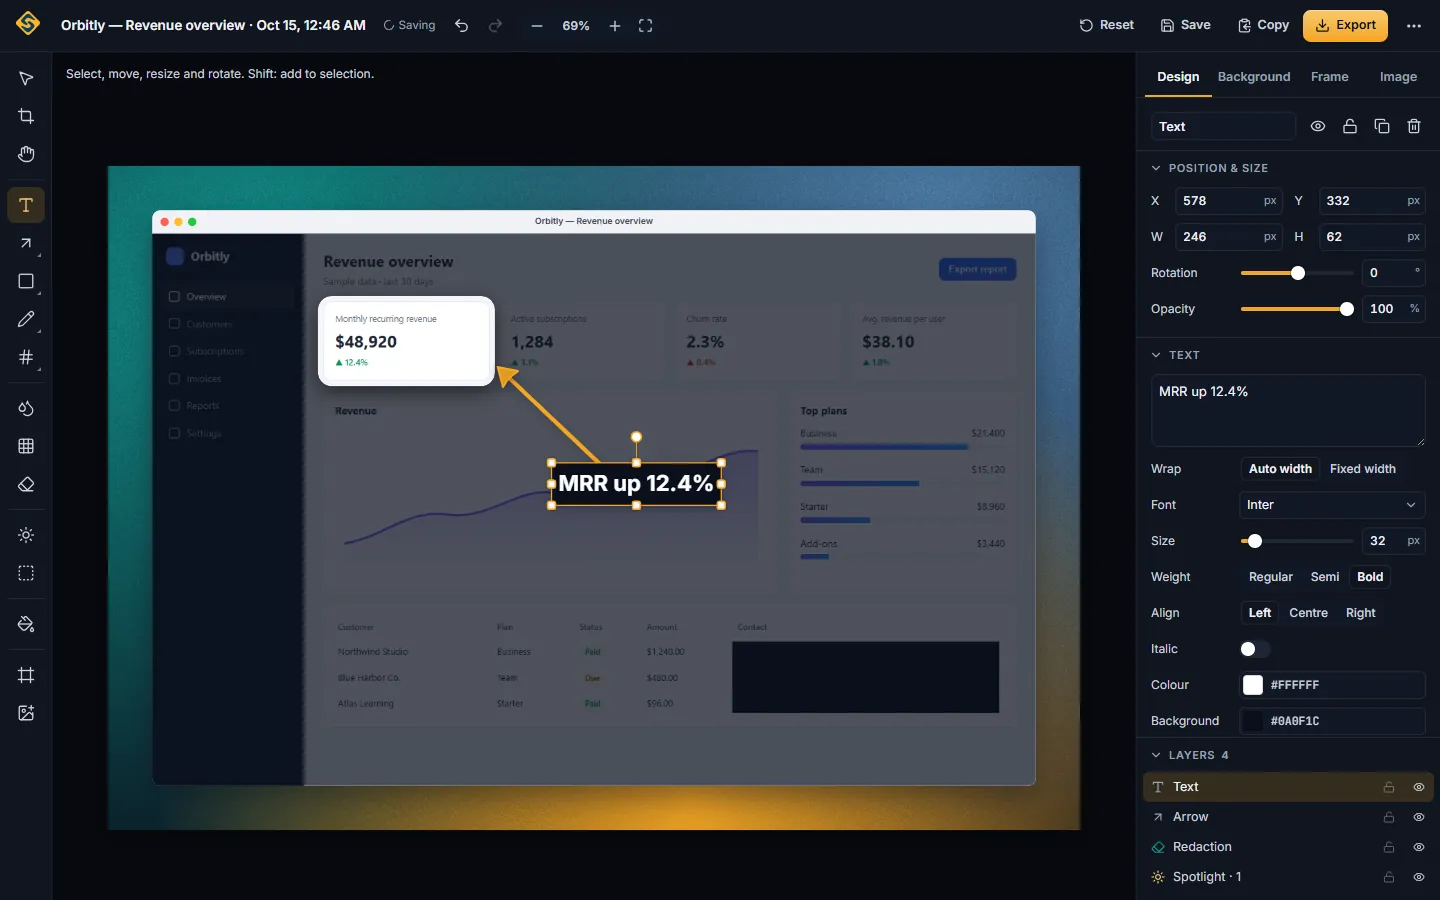
How to annotate a screenshot
-
1
Open the capture in the editor
Every InnoShot capture opens in the editor in its own tab. Pick an annotation tool from the tool rail on the left.
-
2
Add your marks
Draw arrows, lines, shapes and freehand strokes on the canvas, or add text, numbered markers, callouts and speech bubbles where they are needed.
-
3
Style them in the inspector
Set the color, width, opacity, arrowheads, font, size, alignment, fill, outline and shadow. The canvas updates as you change each value.
-
4
Line things up and export
Smart guides and the align tools keep markers and labels tidy. Export PNG, JPEG, WebP or PDF, or SVG to keep the annotations as vectors.
The right mark for every message
Every annotation can be styled with color, width, opacity, fill, outline and shadow, and text with font, size and alignment.
-
Arrows and lines
Straight arrows to point at a button or value, curved arrows that bend around other content, and plain lines, with a choice of arrowheads.
-
Boxes and circles
Rectangles, rounded rectangles and ellipses or circles to frame a field, an icon or a whole panel, filled or outlined.
-
Pen, marker and highlighter
A pen for fine freehand marks, a broader marker, and a highlighter for text in the screenshot. Underline and strikethrough mark a single word or phrase, or show that something is out of date.
-
Numbered markers
Place numbers on the controls in the order a reader should use them, and one screenshot becomes a step-by-step guide. Give them one color and size so they read as a set.
-
Text, callouts and speech bubbles
Text for labels and titles, callouts that point at a specific spot, and speech bubbles for a lighter tone in tutorials and onboarding guides.
Learn more about text, callouts and speech bubbles -
Magnifier
Enlarge a tiny icon or a line of fine print in place. The magnifier never samples redacted pixels, so it cannot reveal anything you have covered.
Good to know
Annotations point things out. A few things they are not meant for.
- Highlighting is not hiding
- A filled box or a thick marker can be partly see-through, and in an editable project it can simply be moved aside to show what is underneath. To cover a token, an account number or personal details, use permanent redaction, which is flattened into every export.
- Effects stay inside the screenshot
- Annotations can reach onto the background, but effect layers such as blur, spotlight, glass and the magnifier are clipped to the screenshot itself. Dragging one partly outside does not spill it onto the margin.
- Fewer marks read better
- When everything is circled, nothing stands out. Use a few annotations in one or two colors that contrast with the page, and reach for a spotlight when the point is where to look rather than what to do.
Screenshot annotation questions
Something else? The full FAQ and the documentation go further.
Can I annotate a screenshot without an extension?
Yes, with the basic tools in your operating system. On Windows, Snipping Tool lets you draw on a capture with a pen or highlighter. On a Mac, clicking the thumbnail that appears after a screenshot opens Markup, with shapes, text and arrows. InnoShot works on the capture in your browser, keeps every annotation as a layer you can change later, and adds numbered markers, callouts, a magnifier and smart guides.
How do I turn one screenshot into a step-by-step guide?
Capture the screen where the steps happen, then place a numbered marker on each control in the order the reader should use it. Give the markers the same color and size, and write steps in your document that match the numbers. A spotlight that dims the rest of the screen makes the steps even easier to follow.
Can I change an annotation after adding it?
Yes, at any time. Select it on the canvas or in the layers panel and its options appear in the inspector. You can also move, resize, rotate, duplicate, group, lock, hide or delete it, and projects you reopen from your history keep their annotations editable.
Can an arrow start outside the screenshot?
Yes. Annotations are not clipped to the screenshot, so when the capture sits on a background with padding, an arrow can start in the margin and point in, and a label or callout can sit beside the image.
Do annotations stay sharp in an SVG export?
Yes. SVG export writes your annotations as vector shapes that stay crisp at any zoom, laid over a flattened raster of the screenshot and its effects. The original image is never embedded, so any redactions stay in place.
Keep reading
- Text and annotations Every annotation tool, its styling options and when to use it.
- Layers Align, group and reorder annotations, and why effects behave differently.
- Spotlight effect Dim everything except the part that matters.
- How to highlight one part of a screenshot Choosing between a spotlight, a highlighter, boxes, arrows and markers.
- Screenshot backgrounds Give your annotations a margin to sit in.
Make your next screenshot self-explanatory
Free, no account, and every annotation stays editable in your local projects.
For Google Chrome on desktop. Coming to the Chrome Web Store.