Show people exactly where to look in a screenshot
A busy interface hides the one button you are writing about. InnoShot's spotlight keeps the regions you draw clear and dims, blurs or desaturates everything around them, so the eye lands in the right place while the rest of the screen still gives context. Draw rectangles, circles, freehand outlines or polygons, highlight several areas at once, and finish the edge with a border, a glow or a soft feather.
Make one part of a screenshot stand out without hiding the rest
Screenshots of real software are crowded. Toolbars, sidebars, notifications and sample data all compete with the one field or menu item your reader needs, and adding more arrows and boxes can make the picture busier still.
A spotlight works the other way round. Instead of drawing more on top of the screenshot, it turns down everything you did not mark: darker, softer or without color. The marked area stays clear, so it reads as the brightest, sharpest part of the image, and the surroundings still show where it sits in the interface.
In InnoShot the spotlight is an editable layer. You can reshape a region, add another, switch the outside effect from dim to blur or save the whole look as a preset, and every change can be undone. The effect is drawn only on the screenshot itself, never over the background or the browser frame around it.
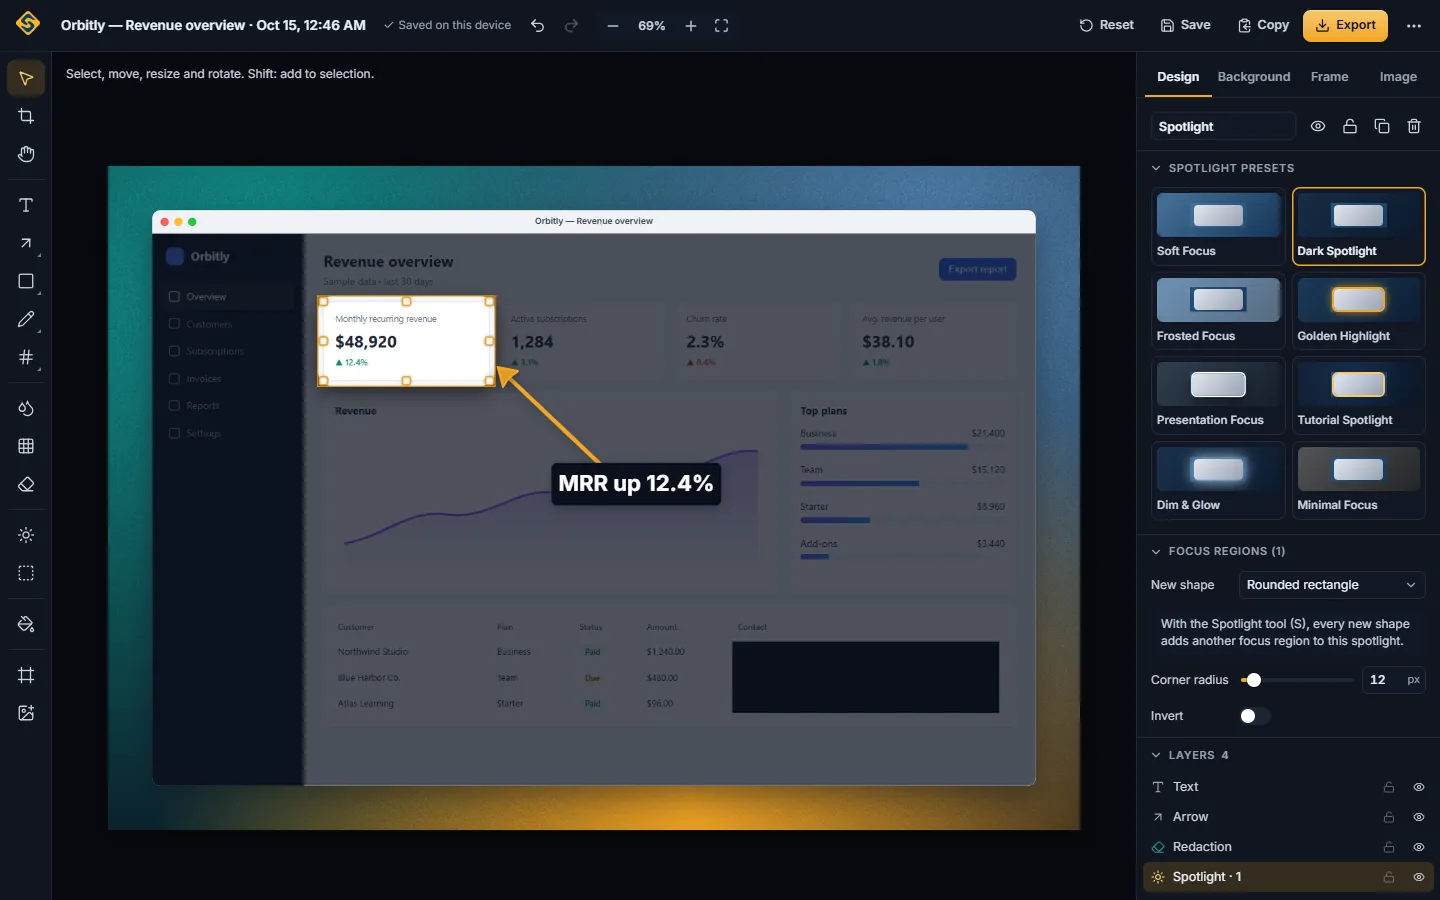
How to highlight part of a screenshot
-
1
Capture the screen you want to explain
Use any capture mode: visible area, full page, a selected area or a single element. InnoShot then opens it in the editor, ready for effects.
-
2
Draw a spotlight region
Pick the spotlight tool from the tool rail, choose a shape and draw it over the control, message or number that matters. Freehand and polygon follow areas that are not rectangular.
-
3
Add more regions, or invert
Draw extra regions to highlight several things at once, such as a label and its field. Turn on invert when you would rather tone down one distracting area instead.
-
4
Choose what happens outside
In the inspector, pick dim, blur, desaturate, dark glass, frosted glass or vignette, set its strength, and feather the edge so the transition looks natural.
-
5
Style the edge and export
Add a solid or gradient border, a glow or a shadow if the region needs more definition, then export the image or copy it to the clipboard.
Every part of the spotlight is adjustable
-
Shapes for any area
Rectangle, rounded rectangle, ellipse and circle cover most buttons, cards and icons. Freehand and polygon follow irregular outlines, such as an angled menu or a cluster of controls.
-
Several regions, or the reverse
Mark more than one area when the explanation needs it, for example a setting and the button that saves it. Invert moves the effect onto the regions themselves, which is handy for playing down a distraction.
-
Outside effects
Dim the surroundings with a color and opacity you pick, blur them, remove their color, lay dark or frosted glass over them, or add a vignette that darkens toward the edges. Feather softens the boundary between the clear area and the rest.
-
Borders, glow and shadow
Outline a region with a solid or gradient border at the width you want, round its corners, add an outer or inner glow, or a shadow that lifts it off the page. Padding adds room around the content.
-
Scale emphasis
Enlarge the content inside a region slightly so it appears to rise toward the viewer. It never reveals pixels you have redacted.
-
Editable presets
Start from a preset that pairs an outside effect with matching styling, adjust it, and save your own so every screenshot in a guide or release note shares the same look.
Learn more about editable presets
Good to know
Spotlight is a presentation effect. A few points keep it working for you.
- It focuses attention, it does not hide secrets
- Dimmed or blurred surroundings can still be read or, in some cases, reconstructed. For passwords, tokens, account numbers or personal data, use permanent redaction, which is flattened into every export.
- The effect stays on the screenshot
- Spotlight is clipped to the screenshot, so the background and frame around it are never dimmed or blurred. Arrows and text sit above the spotlight and can reach out onto the background.
- Leave some context visible
- A very dark dim or a heavy blur can make the rest of the interface unreadable, and readers often need it to find the same spot in the real app. A moderate setting usually works better.
Spotlight effect questions
Something else? The full FAQ and the documentation go further.
How do I highlight one part of a screenshot?
Open the screenshot in the InnoShot editor, pick the spotlight tool, choose a shape and draw it over the area that should stand out. Everything outside the shape then gets the outside effect you choose: dim, blur, desaturate, dark or frosted glass, or vignette. Feather softens the edge, and a border or glow defines it.
Can I spotlight more than one area?
Yes. Add further regions to the same screenshot, for example to show a field and the button that submits it. With invert turned on, the regions receive the effect instead and the rest of the screenshot stays as it was captured.
Is a blurred spotlight safe for hiding sensitive information?
No. Blur is a visual effect, and blurred or pixelated text can sometimes be reconstructed. Use the redaction tool for anything secret: it draws an opaque box that is flattened into every PNG, JPEG, WebP and PDF you export. Spotlight scale emphasis and the magnifier never show redacted pixels.
Can I make a spotlight effect without an extension?
Chrome has no built-in way to do it, and the screenshots DevTools takes come without an editor. The manual route is a layer-based image editor: place a semi-transparent dark layer over the screenshot, cut a hole where the focus should be and soften its edge. InnoShot does the same as one editable layer, right after the capture.
Will the spotlight darken my background or frame?
No. Spotlight effects are clipped to the screenshot, so a gradient background or a browser frame around it keeps its own colors. Only annotations such as arrows and text can extend beyond the screenshot.
Keep reading
- Spotlight, step by step Every shape, outside effect and styling option explained.
- How to highlight one part of a screenshot A short guide to drawing attention to the right spot.
- Glassmorphism effect Add a frosted caption panel next to the highlighted area.
- Screenshot annotation Arrows, numbered markers and text to go with a spotlight.
- Blur, pixelate or redact? Why spotlight blur is not a privacy tool, and what to use instead.
More in Beautify
Point people to the right place
Capture a page, spotlight what matters and export it, all without an account or an upload.
For Google Chrome on desktop. Coming to the Chrome Web Store.